WD -- Initialize Self Test Environment - Powerful Tool for One-click Repairing WD
|
Initialize Self Test Environment -- Powerful Tool for One-click Repairing WD
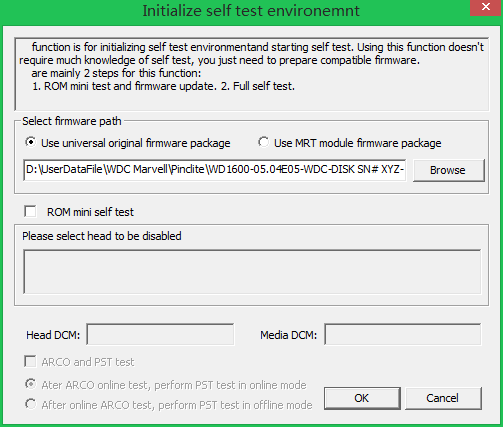
This function menu is located at ‘Tools ->Self test tools ->Initialize self test environment’ in MRT WD part. MRT function of ‘Initialize self test environment’ is a combination of initializing self test environment, auto cutting head and zone and enabling self test. That is to say, this function can enable self test with one click to repair hard disk,which can also called as repairing disk with one click function. It needs to cut head and zone or enable self test to repair western digital hard disk previously, which is complicated. Now function of initializing self test environment can simplify western digital hard repairing, since system can judge status of hard disk automatically, automatically judge which head is damaged, or which zone has bad sector and then cut damaged head and zone, and automatically enable self test , which can repair hard disk without human effort.Therefore this function extremely enhances work efficiency. MRT tool has became only one tool for self test with one click and a friendly user-interface and supporting many hard disk versions(MRT tool can support all family in theory) until now, which can ignore knowledge of complicated self test script process function, process parameters, operation process and so on. MRT users can easily repair hard disk by reading this text and following below tips. Now let us introduce how to use this function. We only need to prepare matched firmware, select head needed to be shielded, fill in matched HeadDCM and MediaDCM , and then choose online self test (hard disk needs to connect MRT card on the process of self test)or offline self test(hard disk does not need to connect MRT card on the process of self test after it connects MRT card and enable function of self test ) according to different requirement. Please click button ‘OK’ after setting interface options and then program will start to work automatically. Even though it can not identify hard disk, we can still choose matched firmware, fill in matched HeadDCM and MediaDCM, and then fill in head needed to be shield to repair hard disk with self test function on the condition that head of hard disk is not damaged. Interface for initializing self test environment is showed as below:
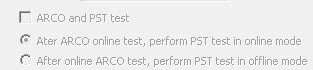
Let’s see the interface. On the top is an illustration listing the two main steps of this function: 1. Initialize self test environment; 2. Start self test. Blow the illustration is selection of firmware path. Click “Browse” to select the folder of firmware to be written to disk. Here are two types of firmware for selection: universal original firmware package (if you don’t have this type of firmware, please contact MRT Lab to get it), and SA modules backed up with MRT software. In the middle is about ROM mini test. Here we should select a ROM file. After selecting ROM file, there will list head map, we can check head to be disabled. Please pay attention that headDCM and MediaDCM are obtained from ROM file. If the utility didn’t get these two values, please input available values manually. If we check the option “ARCO and PST test”, the utility will perform ARCO test and PST test after ROM mini test and firmware update.
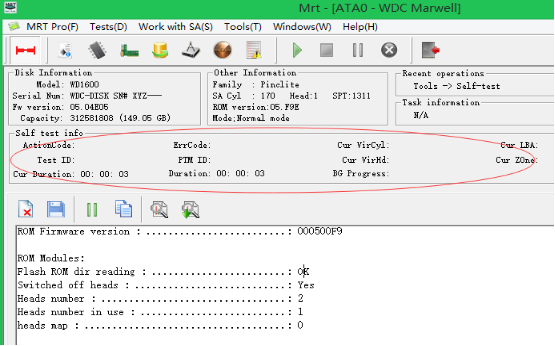
From above picture we can see that, the utility will perform ARCO test automatically, then do PST test in online/offline mode according to our selection.After starting self test, there will show monitoring interface:
This part describes the basic info of current self test process. We can know the progress of self test. PTM ID indicates the corresponding microcode module ID of current self test process. Test ID indicates the number of test sub-function. When error occurs, there will be corresponding value of ErrCode. We can know the progress of current process and estimate how long it will take according to Cur VirCyl, Cur VirHd, and Cur Zone. Cur Duration indicates the running time of current process. Duration indicates the time it takes since the beginning of self test. If self test can be performed smoothly, we can wait for the generation of a good hard disk. Download link of video tutorial: https://us.mrtlab.com/video/wdonekeyrp.rar
|