ST DM series Virtual Start Tutorial
|
Virtual Start is a new function released by MRT Lab to solve Seagate HDDs problemsm, which is a unique function of MRT tools. This tutorial introduces the detailed process of Virtual Start and users can download video from the below link. Video download link:https://us.mrtlab.com/video/sgtdmvlods.rar What problems can Virtual Start solve? It is difficult to repair damaged Seagate drives with suffix DM, like triangle board, DM003-1CH series , 9YN series and so on.These drives couldn’t enter terminal or operate any commands. They may seems to be ready but couldn’t operate any commands,while the capacity shown as 3.86GB, which is a fake readiness status. Usually we can repair 12nd generation drives by writing firmware, but this doesn’t work on DM series drives. When you format SA on DM series drives, you may find that the drive breaks down totally, no command can be operated and you couldn’t write the firmware back either. Virtual start is added to solve these problems. Specially, it can be used when you have below problems:
(1) SA is formatted by mistake and the drive breaks down. You can use the Virtual Start function and write firmware back. As is known that it is not possible to recovery some Seagate drives if the firmware is formatted. Now the MRT Virtual Start is the only solution for this problem.
(2) The drive couldn’t operate any commands or enter T level. We used to use short circuit to solve it, which often fails. Now users can try Virtual Start. If succeeds, the drive will be able to enter T level.
(3) Fake readiness. The drive seems ready but can not operate any commands, the capacity is shown as 3.86GB, and users can not get access to user data. If Virtual Start succeeds, the drive will be truly ready.
Other question about Virtual Start:
(1)How to image separately after Virtual Start succeeds?
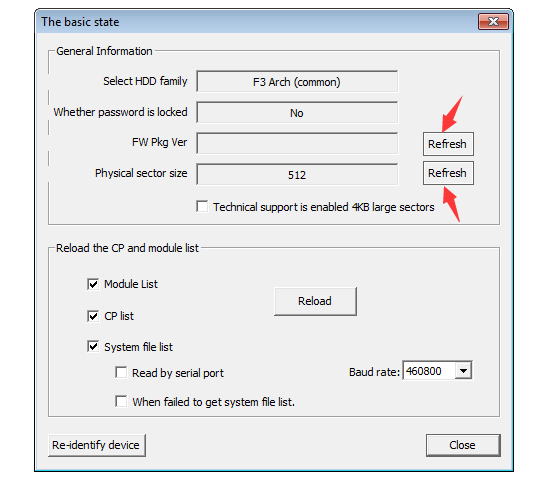
If Virtual Start succeeds, the drive will be ready. Click menu “Tests -> Utility State”, refresh firmware version and physical sector size. After that you will be able to image separately in DE utility. Do remember to refresh them, or you couldn’t image separately even you can enter DE utility.
(1)Where can I get the Loader file used for Virtual Start? The loader file used in Virtual Start is actually module 3D. You can copy it from a drive of Same model. We provides some in this tutorial package. If you couldn’t get module 3D, you can create a Loader file thought menu “Tools - > Loader->create a virtual boot loader”.
(2)what is the subsequent operation after Virtual Start?
The drive will be ready and it will be able to enter T level if Virtual Start succeeds. If you need to recovery data, now you can image directly, there is no need to write the firmware back. If you can not get access to user area, you can solve it by rebuilding the translator under terminal. In one word, you need not to write the firmware back if you only want to access data.
If you need to repair the drive, you need to write the firmware back after Virtual Start, or the drive will return to a fault state when the drive power off. According to the actual situation, you can write the original firmware or the LDR file you copied. In addition, a code will be embedded in ROM when you use Virtual Start, you need to exchange commands every time you power on the drive. So when you finish repairing, please remember to restore original ROM file, or write original firmware to cover the modified ROM data. After you restore ROM, you need not to perform the exchange commands operation.
Basic process of Virtual Start
1.Back up ROM, LDR, 3D module and other modules. It is very important to back up original ROM.
2.Part of the resources can be copied from another normal drive with same model if you can not back up them.
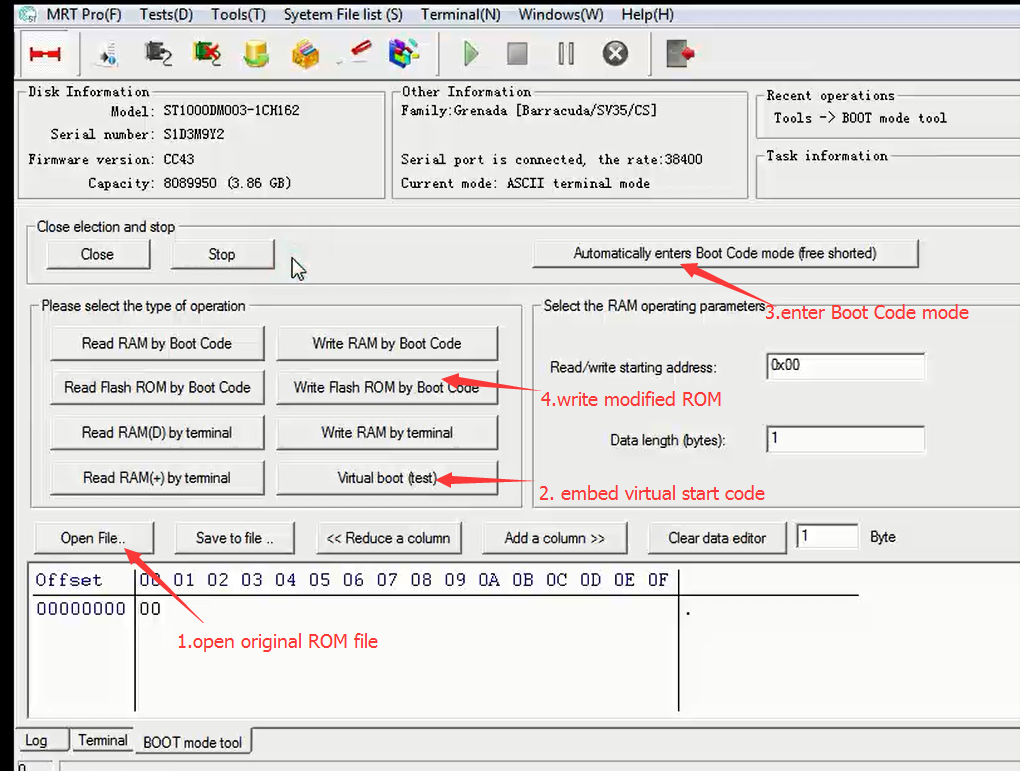
3.Click menu “Tools ->Boot Code tool” and open original ROM file, embed the Virtual Start code in ROM, then use BootCode to write ROM into drive. As shown below
4.After power off and on, as shown below 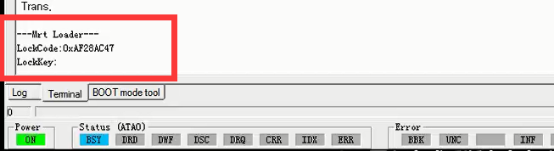 5.DM exchange commands
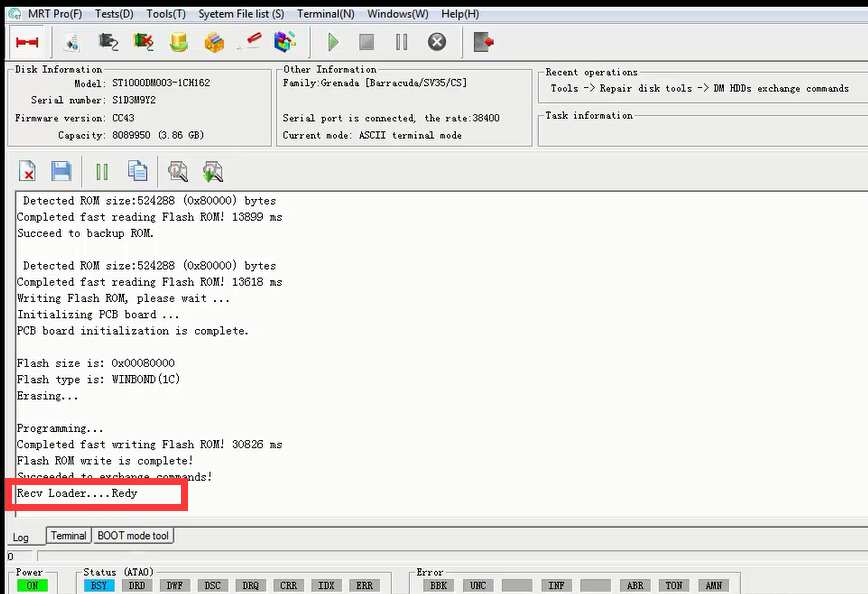
Click menu “Tools-> Disk repair tools->DM HDDs exchange commands”. After success, perform next operation.
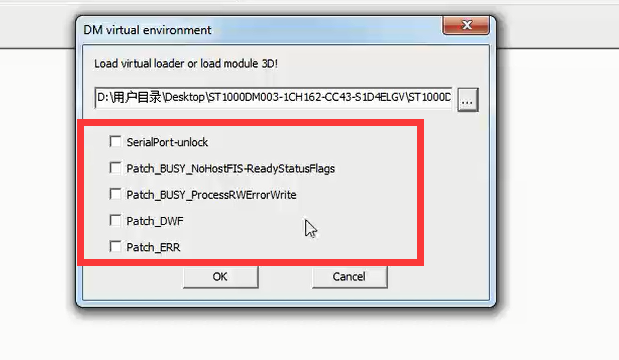
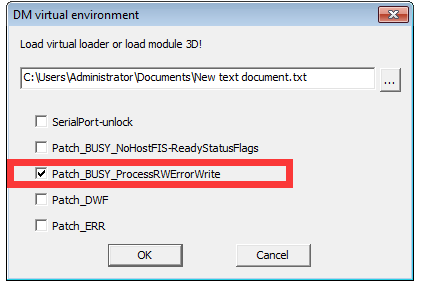
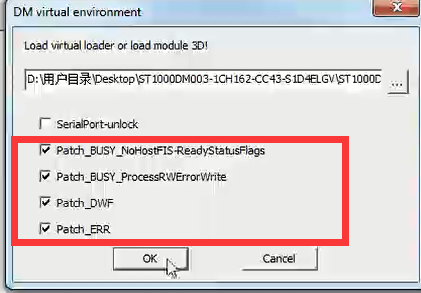
 6.Click menu “Tools- >Virtual start” and load module 3d. Don’t click any option , click “OK” to write.
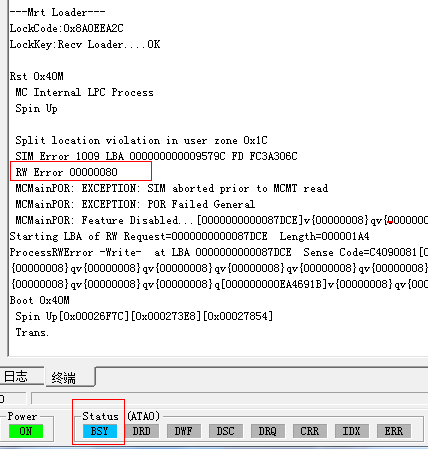
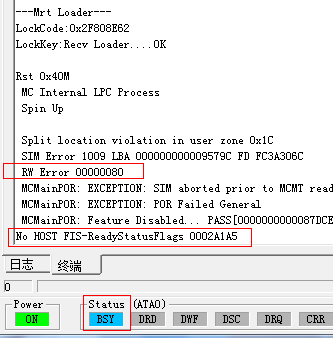
7.View the string returned in the terminal interface
8.When you see the returned RWError, power off and on the drive, perform exchange commands operation. Run Virtual Start again, click below option and write it.
9.View the string returned in the terminal interface.
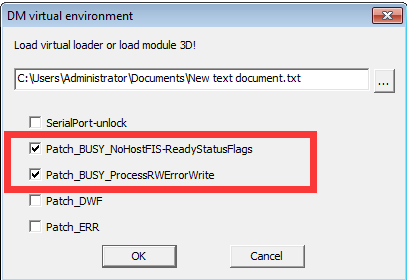
10.The returned string is RWErro and No HOS. Power off and on the drive, perform exchange commands operation. Run Virtual Start again, click below option and write it.
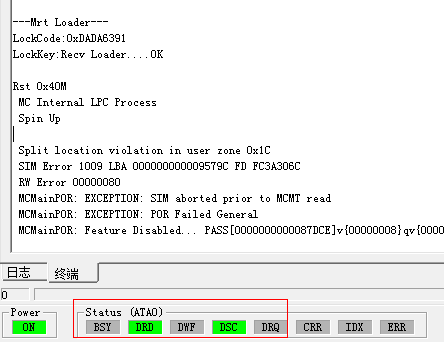
11.The drive is ready now. Load LDR.
12.The light DWF and err is on after loading LDR.
13.Power off and on the drive, perform exchange commands operation. Run Virtual Start again, click below option and write it. 14. The drive is ready. Load LDR again , and it succeeds this time. |