MRT Universal Utility Description
These documents are derived from MRT Firmware Laboratory.
For more information, please visit our website: http://www.mrtexp.com
Content
1. Scan Disk Tools
1.1ScanDisk Tools Main Interface………………………………………………..2
1.2 Menu and Toolbar Description………………………………………………..2
2. Log Page startup Information Description
2.1Normal Circumstance…………………………………………………………4
2.2 Abnormal Circumstance………………………………………………………4
3. Function Menu
3.1 Scanning………………………………………………………………………5
3.2 SMRT…………………………………………………………………………6
3.3Device ID……………………………………………………………………..7
3.4 Set the maximum LBA………………………………………………………8
3.5 Security Subsystem…………………………………………………………..9
3.5.1Freeze Hard Disk……………………………………………………..9
3.5.2 Set the Password……………………………………………………...9
3.5.3Unlock or Cancel the Password………………………………………10
3.5.4Erase the Hard Disk Data …………………………………………….11
Scan Disk Tools
Common function module provides the function of disk scan and other common functions. For example disk surface test, check disk information etc.
1.1 Scan Disk Tool Main Interface
Scan Disk Tools Main Interface as shown in figure 1.1-1.
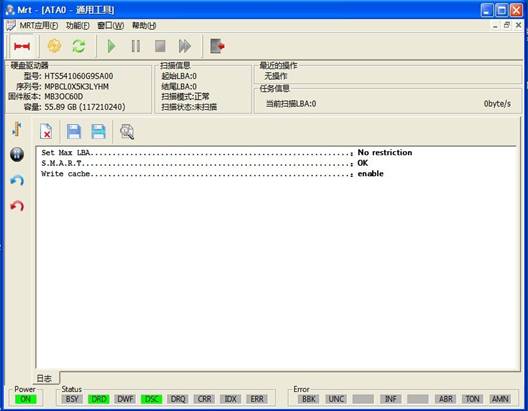
Figure1.1-1 Scan Disk Tools Main Interface
1.2 Menu and Toolbar Description
The main menu of scan disk tools is the “Function” menu, details of the "Function" menu refer to chapter III, the function of other menus is the same with each menu on the main MRT program.
Toolbar![]() is“Setting”(As shown in figure 1.2-1)button,can make the basic settings for scanning operations
such as: no delay, delay, slow down the scan, the maximum timeout …;
is“Setting”(As shown in figure 1.2-1)button,can make the basic settings for scanning operations
such as: no delay, delay, slow down the scan, the maximum timeout …;![]() “Refresh”button,can reload the current
hard disk information;
“Refresh”button,can reload the current
hard disk information;![]() The four buttons are "Start
Scan", "Pause", "Stop", "Fast forward"
button;
The four buttons are "Start
Scan", "Pause", "Stop", "Fast forward"
button; ![]() “Quit”button. Please watch
Chapter III for details of description.
“Quit”button. Please watch
Chapter III for details of description.
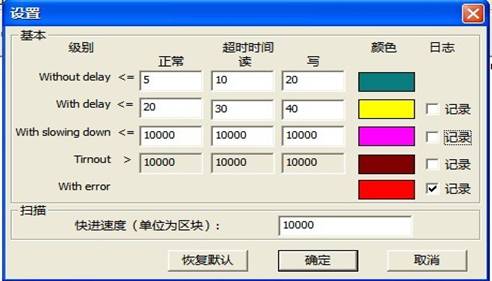
Figure1.2-1 Scan Settings
Log Page Startup Information Description
The information displayed in Scan Disk tools at the startup of the hard disk reflects the current basic statue of the hard disk, such as: whether to set the password, whether to support LBA setting, whether to read…For more details of circumstance, please click “Function——Device ID”to have a check,Log Page Startup Information has respectively the following several circumstances:
2.1 Normal Circumstance

At this time it indicates that the hard disk can set maximum LBA (for more information about setting maximum LBA, please refer to Chapter III); turn on SMART function; open cache writes:

At this time it indicates that the hard disk does not support the maximum LBA setting, other information ditto.
2.2Abnormal Circumstances
![]()
At this time it indicates that the read is wrong,, users should check the status of each register on the status bar, if everything is normal users can click the “Refresh” button to re-read, or still displays the information, it may be due to the damage of the hard disk firmware leads to the program unable to read the hard disk information.

This moment it indicates that the hard disk has set the password, other functions are normal.

This moment it indicates that the hard disk has set the maximum LBA, and displays the current LBA and original LBA.
Function Menu
The function menu of Scan Disk program provides "Scan", "View SMART", "Device ID" and other common functions, menu structure as shown in Figure 3.
3.1 Scanning
Scanning provides the test to the basic statue of hard disk, for example scan the entire disk, bad sector test…
It will pop up the Scan Settings dialog box before the start of scanning(As shown in figure3.1-1),asks users to set the starting point and the end point of scanning.
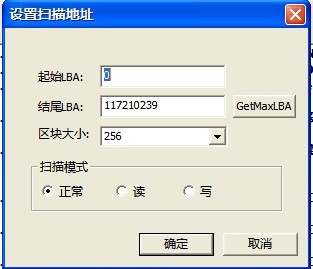
Figure3.1-1 Scanning Setting
After setting the scanning information, click “OK” button to begin to scan.(As shown in figure3.1-2)
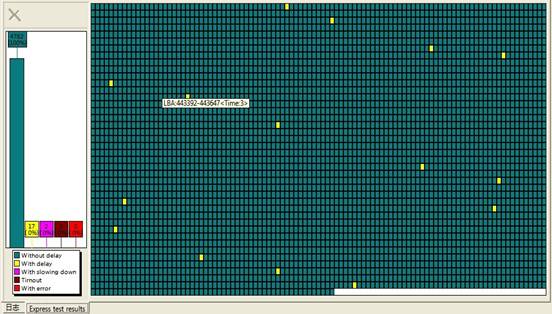
Figure 3.1-2 Scan Status
The scanning result indicates that green blocks represent normal sector, yellow and pink blocks represent that this sector can be read in the specified time, dark red blocks represent the sector can’t be read in the specified time(probably because the timeout is set too short),light red blocks represent the hard disk reports an error while reading this sector
3.2 SMART
Self monitoring, Analysis and Reporting Technology (SMART) (As shown in figure3.2-1) are designed to protect users’ data and reduce the possibility of sudden system downtime caused by the expected degradation or the malfunction. By monitoring and storing critical performance and standards parameters, SMART device attempts to predict the time close to the condition of degradation and malfunction. If the host system knows a non-reliable condition, it will allow users to take appropriate measures.
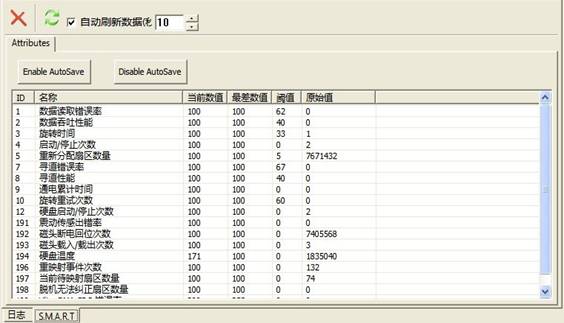
Figure 3.2-1 SMART
Attribute is used to analyze the statue of the device with specific performance or standard parameters. Attribute is based on some attribute by device manufacturers for those special devices to forecast the contribution ability of degradation or malfunction condition and then make a choice. The used special settings and the identity of attribute are specific and proprietary for the suppliers.
Attribute value is used to describe the associated with individual performance or the reliability of standardized attribute. The valid range of attribute value is from 1 to 253. The high attribute value indicates that analysis and calculation is used by the device to forecast the less frequent degradation or the possibility of malfunction condition existing. Therefore,the low attribute value indicates that the analysis and calculation is used by the device to forecast the frequent degradation or the possibility of malfunction condition existing.
Every attribute value has the corresponding attribute ultimate limit, which limits to use direct comparison attribute value indicating that degradation or malfunction condition exists. Attribute limit value is determined by the device manufacturers according to the design and the analysis of the reliable experiment. Ultimate Limit indicates that its corresponding attribute value still remains the positive reliability statue, equal to the lowest limit. The ultimate attribute limit can be set in the factory of the device manufacturers and can’t be changed in the process of use. The valid range of the ultimate limit is from 1to 253.
If one or more attribute value is less or equal to their corresponding ultimate limit, so the reliability statue of device is close to degradation or malfunction condition.
3.3 Device ID
To recognize the detailed information of device, including hard disk model, serial number, capacity, and whether to set the password as well as hard disk supports what functions, whether to start the function.(As shown in figure3.3-1).
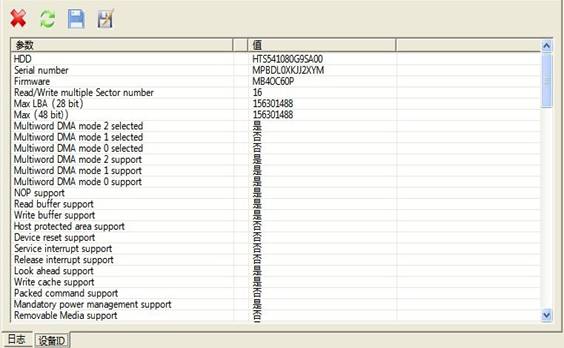
Figure3.3-1 Device ID
3.4 Set the Maximum LBA
Setting the maximum LBA (As shown in figure 3.4-1) can be cut on the hard disk, used in 48-bit mode and the 28–bit mode,48-bit mode maximum addressing up to 0x0H—0xFFFFFFFFFFFFH,28-bit mode maximum addressing up to 0x0H—0xFFFFFFFH. It can be written in RAM or SA service area, written in RAM service area is only valid for this setting, it will recover after the power off, written in SA service area is valid permanently.
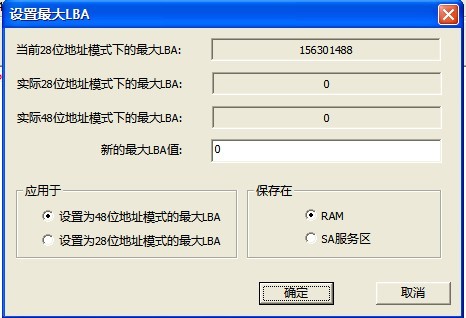
Figure 3.4-1Set the Maximum LBA
After setting the maximum LBA, click“OK”button, it will instantly take effect, if the setting turns out a success, it will display the following information in the log page:
Set Max LBA Succeed...............................................:117210239ll
Otherwise it will display:
Set Max LBA...........................................................:Error
At this time click“Refresh”button, the change of hard disk capacity will be seen in the information bar.
3.5 Security Subsystem
Security Subsystem can carry on the security settings on the hard disk,including freezing the hard disk, adding the host password and user password, erasing the password, erasing data
3.5.1 Freeze the Hard Disk
After the success of freezing the hard disk ,it will display the following information in the log page:
HDD Frozen............................................................:OK
It indicates freezing the hard disk turns out a success.
HDD Frozen............................................................:Error It indicates freezing the hard disk turns out a failure, probably because the hard disk is set the password or it fails to send the command.
3.5.2 Set the Password
Users can set the host password and the user password, (As shown in figure3.5-1)When the level of user password is high, the host password can clear the user password; When the level of the user is the highest, the host password can’t clear the user password.
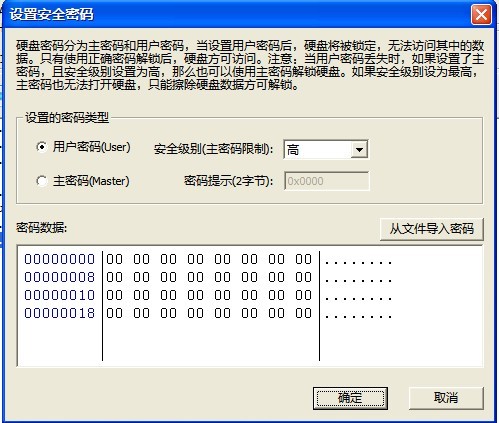
Figure3.5-1Set the Password
After the success of setting password, it will display the following information in the log page:
Setting security password is successful. Password type: user password. Main password capability level: High:
It indicates setting the password is successful. Otherwise it will display the following information, indicating that it fails to set the password.
Security password settings............................................:Error
3.5.3 Unlock or Cancel the Password
When users need to unlock or clear the password, users can firstly click the corresponding type of password needs to be unlocked or to be cleared, and then input the correct password. Click “Temporary Unlock” button, it is only valid in this operation, the hard disk still needs encryption after the power off; Click "permanent abolition of password" to clear the password permanently.
If at this time users lost the user password and the level of password is high, users can use the host password to unlock the user password. Users only need to click "User Password" option in the password type column, and then input the correct host password in the password data, Or import from the file, finally click "Temporary unlock" or "permanent elimination of password" to clear the user password,( as shown in figure 3.5-2).
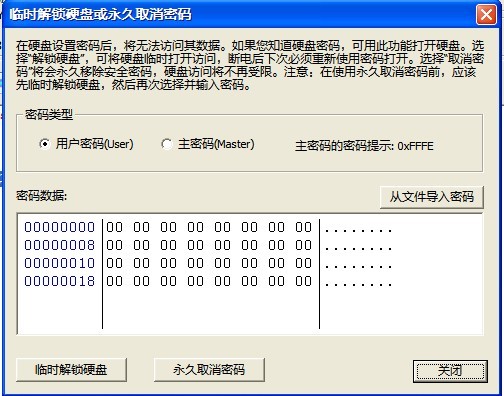
3.5-2Unlock or Cancel the Password
3.5.4 Erase hard drive data
Under the circumstance that without knowing the user password or the level of the user password is the highest, the host password can be used to erase all the data of users, and then the user password will also be erased, data will not recovery after erasing, as shown in figure 3.5-3.
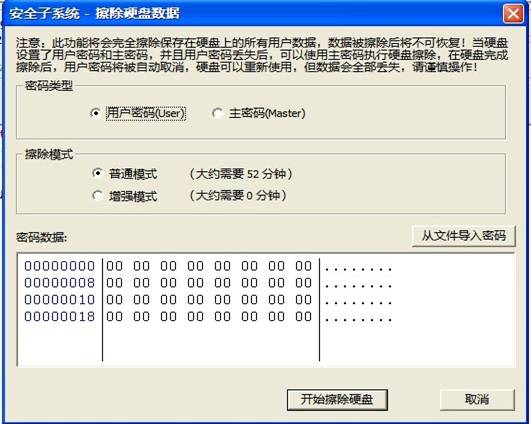
3.5-3 Erase hard disk data